

Knitting is a relaxing and creative craft that allows you to make garments, accessories and home decorations with your own hands.
At first, knitting terminology and techniques can seem complicated. However, once you understand how to cast on, work the basic knit and purl stitches, shape your fabric and cast off, you will have the skills needed to begin your first simple project.
This beginner’s guide explains the essential knitting techniques step by step and helps you choose the tools and materials you need to get started.
Contents
Contents
- Getting Started
- Essential Knitting Tools
- How to Hold Knitting Needles and Yarn
- The Basic Knit Stitch
- The Basic Purl Stitch
- Knit and Purl Stitch Combinations
- Understanding Knitting Tension
- Increasing Stitches
- Decreasing Stitches
- How to Cast Off
- Beginner Cast-On Methods
- Cable Cast-On
- Thumb Cast-On
- Finishing Your Knitting
- Weaving in Yarn Ends
- Sewing Knitted Pieces Together
- Mattress Stitch
- Backstitch
- Kitchener Stitch
- Embroidery on Knitting
- Duplicate Stitch
- Chain Stitch
- Common Beginner Mistakes
- Beginner Knitting Project Ideas
- Choosing Yarn for Your First Project
- Next Steps
- Find Yarn for Your First Knitting Project
Getting Started
You do not need a large collection of equipment to begin knitting. A pair of suitable needles, some smooth yarn and a few basic tools are enough for your first practice piece.
Choose a quiet, comfortable place where you can work without rushing. Knitting becomes easier as your hands become familiar with the movements, so allow yourself time to practise.
It is completely normal for your first stitches to look uneven. Consistency develops gradually.
Essential Knitting Tools
For your first knitting project, you will usually need:
- a pair of knitting needles;
- suitable yarn;
- scissors;
- a tapestry or yarn needle;
- a simple beginner pattern.

Knitting needles

Medium-sized needles are often easiest for beginners to handle. A size between approximately 4 mm and 5 mm is a practical starting point, depending on the yarn you choose.
Wooden or bamboo needles can be helpful because they are less slippery than metal needles.
Yarn
Choose a smooth, medium-weight yarn in a light colour.
Very dark, fluffy or highly textured yarn can make individual stitches difficult to see. A smooth yarn allows you to recognise mistakes more easily and understand how each stitch is formed.
Always check the yarn label for the recommended needle size.

Scissors
A small, sharp pair of craft scissors is useful for cutting yarn neatly.
Tapestry needle
A tapestry needle, also called a yarn needle, has a large eye and a blunt tip. It is used for weaving in loose yarn ends and sewing knitted pieces together.
Beginner pattern
Choose a clearly written pattern that uses only one or two basic stitches. Scarves, dishcloths and simple squares are ideal first projects.

How to Hold Knitting Needles and Yarn
There is no single correct way to hold your needles and yarn. The best method is the one that feels comfortable and allows you to control the yarn without creating excessive tension.
Hold the needle containing your stitches in your left hand and the empty needle in your right hand.
The working yarn is the strand connected to the ball of yarn.
Try to keep your grip relaxed. Holding the needles or yarn too tightly can make it difficult to insert the needle into each stitch.

The Basic Knit Stitch
The knit stitch is one of the two fundamental stitches used in knitting. When worked across every row, it creates a textured fabric known as garter stitch.
How to work a knit stitch
- Hold the needle containing the stitches in your left hand.
- Keep the working yarn behind the needles.
- Insert the tip of the right-hand needle into the front of the first stitch, moving from left to right.
- Wrap the working yarn around the right-hand needle.
- Pull the new loop through the existing stitch.
- Slide the old stitch off the left-hand needle.
One knit stitch is now complete.
Repeat these steps across the row.
Knit stitches usually form smooth V-shaped loops on the right side of stocking stitch fabric.

The Basic Purl Stitch
The purl stitch is the second fundamental knitting stitch. It is essentially the reverse of a knit stitch.
When knit and purl stitches are combined, they can create ribbing, stocking stitch, seed stitch and many decorative patterns.

How to work a purl stitch
- Hold the needle containing the stitches in your left hand.
- Bring the working yarn to the front of the needles.
- Insert the right-hand needle into the front of the first stitch, moving from right to left.
- Wrap the yarn around the right-hand needle.
- Pull the new loop through the existing stitch.
- Slide the old stitch off the left-hand needle.
Purl stitches create small horizontal bumps on the surface of the fabric.
Knit and Purl Stitch Combinations
Once you can work both basic stitches, you can create several common knitting patterns.

Garter stitch
Knit every row.
This creates a soft, reversible fabric with horizontal ridges.
Stocking stitch
Knit one row and purl the next row.
This creates smooth V-shaped stitches on the front and small bumps on the reverse.
In US patterns, stocking stitch is usually called stockinette stitch.
Rib stitch
Alternate knit and purl stitches across the row.
For example:
- knit one, purl one;
- knit two, purl two.
Ribbing is flexible and is commonly used for cuffs, hat bands and jumper hems.
Understanding Knitting Tension
Tension, also known as gauge, describes the number of stitches and rows within a measured area of knitted fabric.
Your tension is affected by:
- yarn thickness;
- needle size;
- how tightly you hold the yarn;
- the stitch pattern being used.
A pattern may ask you to knit a tension square before beginning the main project.
If you have too many stitches within the measured area, your knitting may be too tight. Try using slightly larger needles.
If you have too few stitches, your knitting may be too loose. Try using slightly smaller needles.
Tension is especially important when knitting garments because it affects the finished size.
Increasing Stitches
Increasing adds stitches to your knitting and makes the fabric wider or creates shaping.
Knit Front and Back — KFB
Knit Front and Back is a common beginner increase.
- Knit into the front of the next stitch, but do not slide it off the left-hand needle.
- Insert the right-hand needle into the back of the same stitch.
- Knit through the back loop.
- Slide the original stitch off the left-hand needle.
You have now turned one stitch into two.
KFB creates a small visible bump, which may form part of the design.

Decreasing Stitches
Decreasing removes stitches and makes the knitted fabric narrower.
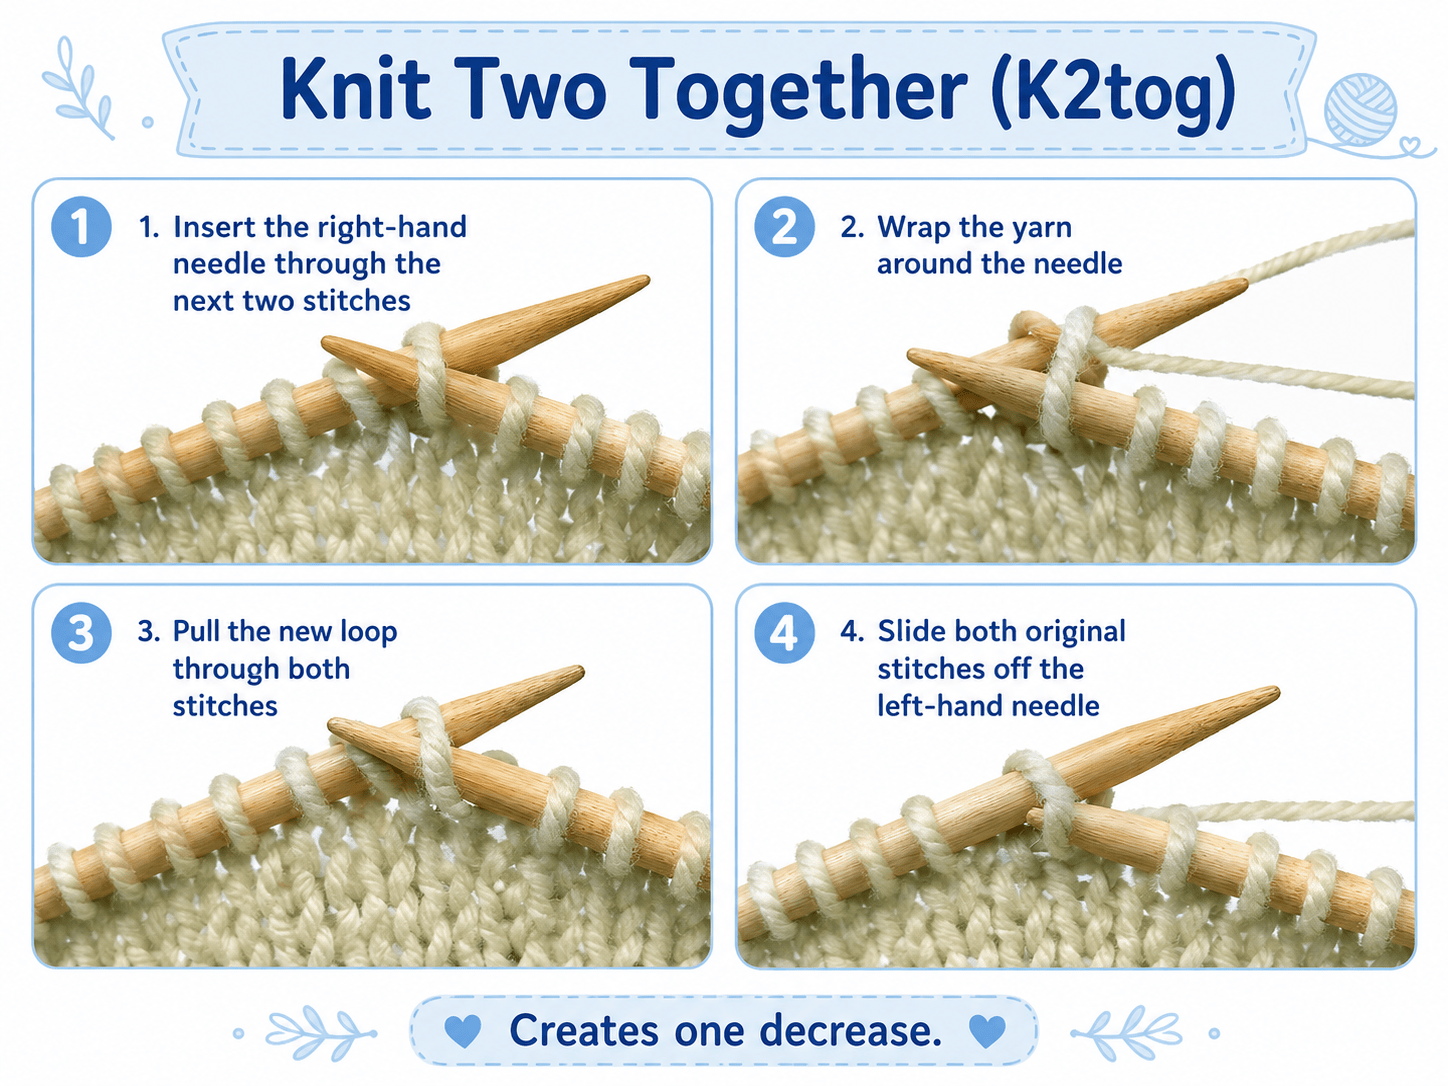
Knit Two Together — K2tog
Knit Two Together is one of the simplest decreases.
- Insert the right-hand needle through the next two stitches at the same time.
- Wrap the yarn around the needle as you would for a normal knit stitch.
- Pull the new loop through both stitches.
- Slide both original stitches off the left-hand needle.
Two stitches have now become one.
K2tog creates a decrease that leans towards the right.
How to Cast Off
Casting off, also called binding off, secures the final row so that your stitches do not unravel.
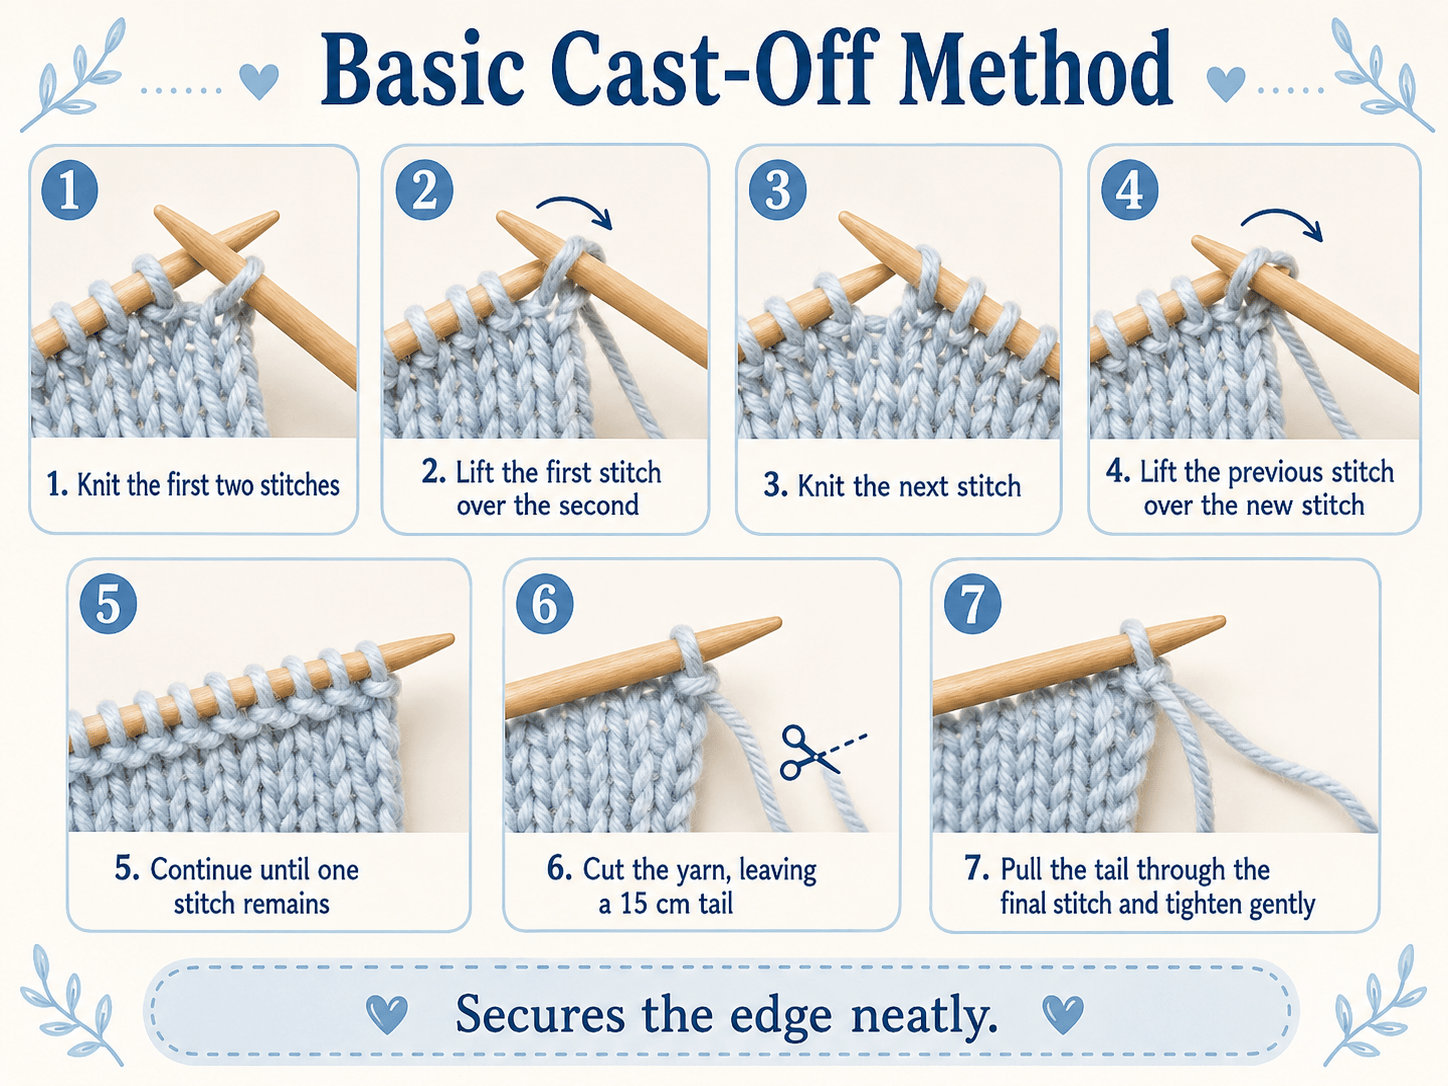
Basic cast-off method
- Knit the first two stitches.
- Use the tip of the left-hand needle to lift the first stitch over the second stitch and off the right-hand needle.
- Knit the next stitch.
- Lift the previous stitch over the new stitch.
- Continue until one stitch remains.
- Cut the yarn, leaving a tail of approximately 15 cm.
- Pull the tail through the final stitch and tighten gently.
Try not to cast off too tightly, as this can make the finished edge narrower than the rest of the fabric.
Beginner Cast-On Methods
Casting on creates the first row of stitches on your needle.
There are many cast-on techniques. The following methods are useful for beginners.
Cable Cast-On
The cable cast-on creates a firm and tidy edge.
How to work a cable cast-on
- Make a slip knot and place it on the left-hand needle.
- Knit into the slip knot without sliding it off the needle.
- Place the new loop onto the left-hand needle.
- Insert the right-hand needle between the two stitches.
- Wrap the yarn and pull a new loop through.
- Place the new loop onto the left-hand needle.
- Repeat until you have the required number of stitches.

This method is suitable when you need a structured edge.
Thumb Cast-On
The thumb cast-on is quick and creates a more flexible edge.

How to work a thumb cast-on
- Leave a yarn tail long enough for the number of stitches required.
- Make a slip knot and place it on the needle.
- Hold the yarn tail around your thumb.
- Insert the needle upwards through the loop around your thumb.
- Wrap the working yarn around the needle.
- Pull it through the loop.
- Remove your thumb and tighten the new stitch gently.
- Repeat until you have the required number of stitches.
Avoid tightening each stitch excessively, as this can make the first row difficult to knit.
Finishing Your Knitting
Finishing is an important part of every knitting project. Careful finishing can make even a simple project look much neater.
Finishing may include:
- weaving in yarn ends;
- sewing pieces together;
- blocking the fabric;
- adding buttons or decorative details;
- checking and correcting uneven edges.
Weaving in Yarn Ends
Thread the loose yarn tail through a tapestry needle.
Weave it through several stitches on the wrong side of the work, following the direction of the knitted fabric.
Avoid pulling too tightly, as this may distort the finished piece.
After weaving the yarn securely through several stitches, trim the excess.
Sewing Knitted Pieces Together
Many garments and accessories are knitted in separate pieces and joined afterwards.
Mattress Stitch
Mattress stitch creates a neat, almost invisible seam between two knitted pieces.
- Place the two pieces next to each other with the right sides facing upwards.
- Identify the horizontal bars between the first and second stitches along each edge.
- Insert the tapestry needle under one bar on the first piece.
- Insert it under the corresponding bar on the second piece.
- Continue working from side to side.
- Pull the yarn gently every few stitches to close the seam.
Do not pull too tightly, as the seam should remain flexible.

Backstitch

Backstitch creates a strong, durable seam.
- Place the knitted pieces with the right sides facing each other.
- Thread a tapestry needle with matching yarn.
- Work small backward stitches along the seam line.
- Keep the stitches even and avoid pulling the yarn too tightly.
Backstitch is useful for shoulder seams and areas requiring extra streng
Kitchener Stitch
Kitchener stitch is used to join two sets of live stitches without creating a visible seam.
It is commonly used for closing the toes of knitted socks.
The stitches remain on two needles while a tapestry needle is used to pass the yarn through them in a particular sequence.
Because the sequence must be followed carefully, beginners may find it helpful to practise Kitchener stitch on a small sample before using it on a finished project.

Embroidery on Knitting
Embroidery can be used to decorate plain knitted fabric, add details or repair an area.
Duplicate Stitch

Duplicate stitch follows the shape of existing knitted stitches.
- Thread a tapestry needle with a contrasting yarn.
- Bring the needle through the base of a V-shaped stitch.
- Follow the existing stitch by passing the yarn behind the two upper arms of the V.
- Return the needle through the base of the stitch.
Duplicate stitch is useful for adding small motifs, letters and colour details.
Chain Stitch
Chain stitch creates a line of connected loops on the surface of knitted fabric.
It can be used for:
- outlines;
- lettering;
- decorative borders;
- stems and curved lines.
Keep the embroidery yarn relaxed so that the knitted fabric remains flexible.

Common Beginner Mistakes
Mistakes are a normal part of learning to knit.
Working too tightly
Tight stitches can make it difficult to insert your needle.
Try relaxing your hands and allowing the yarn to move more freely.
Working too loosely
Very loose stitches can create an uneven fabric.
Keep the yarn gently controlled, but do not pull it tightly after every stitch.
Accidentally adding stitches
Extra stitches may appear if the yarn is incorrectly wrapped over the needle or if one stitch is worked twice.
Count your stitches at the end of each row.
Dropping stitches
A stitch may slide off the needle and begin to unravel.
Stop working as soon as you notice it. Use a crochet hook or knitting needle to lift the stitch back through the loops above it.
Forgetting whether to knit or purl
Use a row counter, notebook or removable stitch marker to help you keep track of your pattern.
Choosing difficult yarn
Very fluffy, dark or textured yarn can hide the stitch structure.
Practise with smooth, light-coloured yarn until you feel more confident.
Remember that practice makes progress. Uneven stitches and small mistakes are part of developing your skills.
Beginner Knitting Project Ideas
Once you are comfortable with the knit and purl stitches, try a small beginner-friendly project.
Suitable first projects include:
- a garter stitch scarf;
- a knitted dishcloth;
- a simple headband;
- a basic cushion cover;
- a rectangular baby blanket;
- a simple ribbed hat;
- knitted squares for a patchwork blanket.
Choose a project with a simple shape and clear instructions.
Completing a smaller project can help build confidence before you begin a jumper or another fitted garment.
Choosing Yarn for Your First Project
The best beginner yarn is usually:
- smooth rather than fluffy;
- light or medium in colour;
- easy to separate into individual stitches;
- suitable for medium-sized needles;
- comfortable to hold;
- appropriate for the selected pattern.
Check the yarn label for:
- fibre content;
- yarn weight;
- recommended needle size;
- care instructions;
- ball weight and length;
- dye lot number.
If your project requires more than one ball, try to buy yarn from the same dye lot to reduce the risk of slight colour differences.
Next Steps
Once you can cast on, knit, purl, increase, decrease and cast off, you have the core skills needed for many beginner patterns.
Continue practising regularly and try not to worry about small mistakes. Every experienced knitter began with uneven stitches and unfamiliar techniques.
Your next steps could include:
- learning additional cast-on methods;
- practising rib and seed stitch;
- understanding written knitting patterns;
- learning how to read knitting charts;
- making a tension square;
- trying your first shaped project.
Find Yarn for Your First Knitting Project
Choose smooth, beginner-friendly yarn in a colour that makes the stitches easy to see.
Explore the JustKnit range of knitting yarns in different weights, fibres, textures and colours to find suitable materials for your first scarf, hat, blanket or other handmade project.